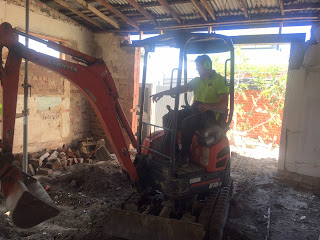
Concreters make their appearance on Thursday, one day later than we hoped. This means we are not there to see the next steps as we leave to catch our flight to Hobart not long after their arrival. The slab is poured on Saturday, so it is there for admiration on Monday when we return.
Photos are courtesy of Peter's daughter Barb, who conveniently came by on Saturday to drop off a washing machine.
A blog recording the progress of our renovations of "the guest wing".
Saturday, 28 October 2017
Thursday, 19 October 2017
More progress
Plumbers come on Monday and do all the sewerage pipes in about 3 hours. Amazing stuff, poly pipe.
Luke works hard all Monday to Wednesday on framing, and you can now really see how the bathroom will work.
Hangers are in place for the new ceiling in the front part of the main room, and supports for the skylight.
Inspection of the rafters under the skillion roof shows they aren't up to much, so we will not only rip off the tin, but scrap the rafters as well and have a complete new roof there.
All goes quiet today and we enjoy not having to get out of bed at 6:30am. Looking forward to another builder-free day tomorrow.
Next week the slab!
Friday, 13 October 2017
How to fit BIG beams
Dave arrives with two big steel beams on his truck, one to hold up the roof, the other the lintel over the new doors in the back wall.
Moving these safely takes some doing. And five other blokes.
First, you take the big roof support beam off the truck.
Then you back the truck into the courtyard area, so that the lintel beam is close to the back of the house, where it is going to finish up.
Then a couple of people climb on to the truck, three more on ladders, and you shift the lintel off the roof rack (left)....
... and into place (right).
Now for the big beam.
It goes in through the old bathroom window, with a carefully placed cross strut inside to take the weight as it goes in.
First Dave briefs everyone on the plan.
Step 1: Lift one end to the window sill.
Step 2: Start lifting and shoving.
Step 3: Keep lifting and shoving!
Step 4: Keep it going...
Step 5: Getting organised on the inside - more directions from Dave
Step 6: Keep it coming...
Step 7: In and level.
Step 8: Lifting one end up...
Step 9: ...and into place on the newly prepared brickwork.
Step 10: Lift and swing the other end in on to the top of the nib wall left just for this purpose.
Job done!
Isn't it lovely watching experts at work?
Moving these safely takes some doing. And five other blokes.
First, you take the big roof support beam off the truck.
Then you back the truck into the courtyard area, so that the lintel beam is close to the back of the house, where it is going to finish up.
Then a couple of people climb on to the truck, three more on ladders, and you shift the lintel off the roof rack (left)....
... and into place (right).
Now for the big beam.
It goes in through the old bathroom window, with a carefully placed cross strut inside to take the weight as it goes in.
First Dave briefs everyone on the plan.
Step 1: Lift one end to the window sill.
Step 2: Start lifting and shoving.
Step 3: Keep lifting and shoving!
Step 4: Keep it going...
Step 5: Getting organised on the inside - more directions from Dave
Step 6: Keep it coming...
Step 7: In and level.
Step 8: Lifting one end up...
Step 9: ...and into place on the newly prepared brickwork.
Step 10: Lift and swing the other end in on to the top of the nib wall left just for this purpose.
Job done!
Isn't it lovely watching experts at work?
Demolition continues - Construction begins!
Deconstruction:
Hole in the back wall enlarged to make the space for the new, larger sliding doors. (More light!)
Hole cut in the floor of the second bedroom where the new bathroom will go, with a tiled floor.
Hole in the back wall enlarged to make the space for the new, larger sliding doors. (More light!)
Hole cut in the floor of the second bedroom where the new bathroom will go, with a tiled floor.
Construction:
Preparing for the new beam to hold up the roof in the back room where the wall has been removed. One end goes here (left) and the other there (right).
Saturday, 7 October 2017
Let there be light!
The wall is down. With each bit of the demolition, the back room becomes brighter. Still to come, bigger sliding doors and a skylight.
Meanwhile, here's the current picture...
Here's where the wall isn't any more. On the left, the end-on view. Above the view from the side.
From the back window, looking in...
From the doorway, looking out.
Meanwhile, here's the current picture...
Here's where the wall isn't any more. On the left, the end-on view. Above the view from the side.
From the back window, looking in...
From the doorway, looking out.
Thursday, 5 October 2017
Demolition continues...
Today Tony (builder) comes with Chris and Luke, so we can discuss the finer points of how the beam and new ceilings will work, and where the skylight might go. Chris and Luke then get on with erecting temporary framing to prop up the roof, then start to remove the internal wall. Tony comes back later for a look and informs us that there was so little holding up the brickwork above the place where half the wall had been removed back in the 70s that it was a bit surprising it hadn't fallen down. We are looking forward to it being replaced by a nice solid steel beam.
Tomorrow they are going to start removing the actual wall.
Here are today's pictures of the temporary framing and the removal of the bricks and old beams over the space between the two parts of the room.
On the right - framing.
Below right, looking up into the new gap where bricks have been removed.
Below left, the old wall, next thing to go.
Subscribe to:
Posts (Atom)